
五 缓存
缓存简介
Magento 2使用zend_cache与缓存存储交互。然而,Magento 2也有Magento\Cache库实现的具体缓存Magento。这些主题讨论如何配置缓存和缓存类型。
默认情况下,文件系统缓存启用;位于 <Magento 2 安装目录>/var.
更改缓存配置,编辑<Magento 2 安装目录>/app/etc/env.php.
缓存配置是与下列类似的关联数组:
'cache_types' =>
	array (
		'config' => 1,
		'layout' => 1,
		'block_html' => 1,
		'collections' => 1,
		'db_ddl' => 1,
		'eav' => 1,
		'full_page' => 1,
		'translate' => 1,
		'config_integration' => 1,
		'config_webservice' => 1,
		'config_integration_api' => 1,
	),
);
@缓存类型
1, 副缓存前端缓存类型
Magento 2允许您配置文件系统缓存替代默认缓存。本指南讨论了一些替代方案,即,
.Database
.Redis
.设置 Varnish 无需修改Magento的配置。
Magento 2使用以下缓存术语:
Frontend: Magento\Framework\Cache\Frontend.
Cache types: 可以设置一个类型Magento 2也可以创建你自己的.
Backend: 指定详细信息 cache storage, 实施 Magento\Framework\Cache\Backend
以下配置缓存选项 :
修改默认前端缓存,只需要修改 <Magento 2 安装目录>/app/etc/di.xml
配置您的自定义前端缓存,只需修改 <Magento 2 安装目录>/app/etc/env.php 因为它覆盖了等效配置 di.xml
Varnish 不需要更改Magento 2的配置.
2, 低级别缓存
前端低级别缓存
Magento 2 继承 Zend_Cache_Core 通过 Magento\Framework\Cache\Core 来实现前端低级别缓存.
后端低级别缓存
Redis
Database
Varnish不需要设置低级缓存
3, 数据库缓存
数据库缓存概述
本主题讨论如何使用Magento 2数据库缓存.
cache和cache_tag,缓存的对象存储在Magento 2数据库表。不存储var/cache或var/page_cache.
- 使用默认的前端缓存, 只需要修改
di.xml - 使用一个自定义的前端缓存, 只需要修改
env.php
数据库缓存 使用default前端缓存
为了使数据库前端缓存使用默认,你必须修改<Magento 2 安装目录>/app/etc/di.xml。
修改di.xml:
- 登录到magento2服务器,切换到 Magento 2文件系统所有者.
- 输入下列命令以复制
di.xml:
cd <Magento 2 安装目录>/app/etc
cp di.xml di.xml.bak 打开di.xml在文本编辑器中找到下面的块:
<type name="Magento\Framework\App\Cache\Frontend\Pool">
   <arguments>
      <argument name="frontendSettings" xsi:type="array">
          <item name="page_cache" xsi:type="array">
              <item name="backend_options" xsi:type="array">
                <item name="cache_dir" xsi:type="string">page_cache</item>
              </item>
          </item>
      </argument>
   </arguments>
</type>
<type name="Magento\Framework\App\Cache\Type\FrontendPool">
   <arguments>
      <argument name="typeFrontendMap" xsi:type="array">
        <item name="full_page" xsi:type="string">page_cache</item>
      </argument>
   </arguments>
</type>
用以下替换整个块:
<type name="Magento\Framework\App\Cache\Frontend\Pool">
	<arguments>
    	<argument name="frontendSettings" xsi:type="array">
    	    <item name="page_cache" xsi:type="array">
    	      <item name="backend" xsi:type="string">database</item>
     	       </item>
     	     <item name="<your cache id>" xsi:type="array">
     	     <item name="backend" xsi:type="string">database</item>
     	     </item>
   		</argument>
	</arguments>
</type>
<type name="Magento\Framework\App\Cache\Type\FrontendPool">
	<arguments>
 	   <argument name="typeFrontendMap" xsi:type="array">
 	       <item name="backend" xsi:type="string">database</item>
 	   </argument>
	</arguments>
</type>- 保存您的更改并退出文本编辑器di.xml。
- 继续验证数据库的缓存工作.
数据库缓存使用自定义前端缓存
为了使数据库缓存使用自定义缓存前端,你必须修改<Magento 2 安装目录>/app/etc/env.php:
- 登录到magento 2服务器,转换到 Magento 2文件系统所有者.
- 输入下列命令以复制
env.php
cd <Magento 2 安装目录>/app/etc
cp env.php env.php.bak 打开env.php在文本编辑器中任何地方添加如下
'cache_types' =>:
'cache' => [
    'frontend' => [
        '<unique frontend id>' => [
             <cache options>
        ],
    ],
    'type' => [
         <cache type 1> => [
             'frontend' => '<unique frontend id>'
        ],
    ],
    'type' => [
         <cache type 2> => [
             'frontend' => '<unique frontend id>'
        ],
    ],
],- 保存
env.php的更改,并关闭编辑器. - 继续下一节 .
验证数据库的缓存工作
验证数据库缓存工作,明确当前的缓存目录,在Web浏览器的任何可缓存的页面,并验证数据写入数据库而不是文件系统。
使用步骤:
- 登录magento 2服务器,切换到Magento 2文件系统所有者.
- 清除当前缓存目录 :
rm -rf <Magento 2 安装目录>/var/cache/* <Magento 2 安装目录>/var/page_cache/* <Magento 2 安装目录>/var/di/* <Magento 2 安装目录>/var/generation/*
- 在Web浏览器中,去任何可缓存的页面.如果显示异常, 验证
di.xml语法,然后再试一次. (要在浏览器查看到异常显示,你必须 使用开发者模式.) - 输入下面的命令:
ls <Magento 2 安装目录>/var/cache/*
ls <Magento 2 安装目录>/var/page_cache/*- 请验证两个目录是否为空;如果没有,请再次编辑
di.xml纠正任何问题。 - 使用一个数据库工具,例如 phpMyAdmin 查看
cache和cache_tag表.
显示结果都有数据
配置实例
本节包含配置数据库缓存示例代码片段。
前端默认缓存di.xml示例
di.xml代码片段:
<type name="Magento\Framework\App\Cache\Frontend\Pool">
        <arguments>
            <argument name="frontendSettings" xsi:type="array">
                <item name="page_cache" xsi:type="array">
                  <item name="backend" xsi:type="string">database</item>
                    </item>
                  <item name="default" xsi:type="array">
                  <item name="backend" xsi:type="string">database</item>
                  </item>
            </argument>
        </arguments>
    </type>
    <type name="Magento\Framework\App\Cache\Type\FrontendPool">
        <arguments>
            <argument name="typeFrontendMap" xsi:type="array">
                <item name="backend" xsi:type="string">database</item>
            </argument>
        </arguments>
</type>一个自定义的前端缓存env.php示例
env.php代码片段,所有的缓存类型与自定义前端缓存命名magento_cache:
 'cache' => [
     'frontend' => [
        'magento_cache' => [
             'backend' => 'database'
         ],
      ],
      'type' => [
         'config' => [
            'frontend' => 'magento_cache'
          ],
         'layout' => [
            'frontend' => 'magento_cache'
          ],
         'block_html' => [
            'frontend' => 'magento_cache'
          ],
         'view_files_fallback' => [
            'frontend' => 'magento_cache'
          ],
         'view_files_preprocessing' => [
            'frontend' => 'magento_cache'
          ],
         'collections' => [
            'frontend' => 'magento_cache'
          ],
         'db_ddl' => [
            'frontend' => 'magento_cache'
          ],
         'eav' => [
            'frontend' => 'magento_cache'
          ],
         'full_page' => [
            'frontend' => 'magento_cache'
          ],
         'translate' => [
            'frontend' => 'magento_cache'
          ],
         'config_integration' => [
            'frontend' => 'magento_cache'
          ],
         'config_integration_api' => [
            'frontend' => 'magento_cache'
          ],
         'config_webservice' => [
            'frontend' => 'magento_cache'
          ],
      ],
  ],
@Magento2页面缓存
1, 页面缓存概述
缓存是提高各种Web应用程序性能的最有效方法。一般来说,缓存有两种方式:客户端(浏览器)和服务器端。此外,有两种类型的内容:公共(可供多个客户)和私人(具体到一个客户)。
Magento2页面缓存是full-page cache; 也就是缓存整个页面
默认缓存机制存储缓存文件有以下方式:
在文件系统上.你不需要做任何事情,使用基于文件的缓存.
Database
Redis
Varnish (推荐)
可缓存和不可缓存的页面
Cacheable(可缓存) 和 uncacheable(不可缓存) 我们使用的术语是指一个页面是否应该全部缓存。(默认情况下,所有的页面都缓存。)
创建一个不可缓存的页面,页面中的块使用 cacheable=”false”标记.
例如 购物车页面,结算页面等等是不可缓存的页面.
Public(公共的)和 私人(private)的内容
Private 页面上的内容仅用于一个用户 ; 例如用户登录的用户名. 在高速缓存页中呈现私有内容有时被称为hole punching ,我们将在下一个主题中更详细地讨论它。
2, Public(公共的和私人(private)的缓存内容
Magento 2的页面缓存存储整个缓存页面;页面存储取决于内容是否是私人或公共的。这些术语定义如下:
Public, 可以向许多客户展示.
公开的内容存储在缓存存储(文件系统,数据库,或Redis),或Varnish。公共内容包括页眉、页脚和类别列表。
Private, 这是不存储在Magento服务器缓存;相反,它是存储在客户端。
私人内容包括收藏、购物车、客户名称、地址。私有内容应限制在页面总内容的一小部分。
3, HTTP context(上下文)
缓存服务器和代理服务器通常使用URL作为缓存标识符;然而,Magento 2的URL是不足区分缓存。(我们可以缓存客户组,选定的语言,客户是否登录,等等)。
为让每个缓存的URL完全独特的,我们用 HTTP上下文变量使Magento2内容基于不同客户群,同一个URL选择的语言,无论用户登录与否,等等。
上下文变量不能针对一个用户,因为变量用于公共内容的缓存密钥中。换句话说,每个用户的上下文变量会导致每个用户在服务器上缓存的内容的单独副本。
Magento2将字符串中的上下文变量,从字符串生成缓存,并设置它的值 X-Magento-Vary cookie. HTTP代理可以配置为基于cookie和URL计算缓存的唯一标识符。例如,Varnish 4 配置 :
sub vcl_hash {
if (req.http.cookie ~ “X-Magento-Vary=”) {
hash_data(regsub(req.http.cookie, “^.?X-Magento-Vary=([^;]+);.*$”, “\1”));
}
… more …
}
有关上下文类的示例,请参见 Magento/Framework/App/Http/Context.
@缓存失效和私有内容版本
缓存失效
Magento 2实体变化后可以清空缓存,立即查看效果。我们使用 IdentityInterface 将应用程序中的实体与缓存的内容连接起来,并知道当实体改变时要清除哪些缓存。
本节讨论当你改变一个实体时如何告知Magento 2应用清除缓存。
首先,你的实体模块必须实现 Magento/Framework/DataObject/IdentityInterface 如下:
use Magento\Framework\DataObject\IdentityInterface;

class Product implements IdentityInterface
{

     /**
      * Product cache tag
      */
     const CACHE_TAG = 'catalog_product';

    /**
     * Get identities
     *
     * @return array
     */
    public function getIdentities()
    {
         return [self::CACHE_TAG . '_' . $this->getId()];
    }
} 其次,块对象也必须实现Magento/Framework/DataObject/IdentityInterface如下:
class View extends AbstractProduct implements \Magento\Framework\DataObject\IdentityInterface
{
    /**
     * Return identifiers for produced content
     *
     * @return array
     */
    public function getIdentities()
    {
        return $this->getProduct()->getIdentities();
    }
}
私人内容版本
私有内容存储在浏览器本地存储中,使用private_content_version cookie存储版本.
六 配置REDIS
@Magento 2 页面缓存和默认缓存中使用Redis
先决条件
先安装Redis.
Magento 2 页面缓存和默认缓存中使用Redis配置
Magento 2 页面缓存和默认缓存中使用Redis示例. magento 2 缓存 实现类Magento\Framework\App\CacheInterface.
添加类似于下面的配置到<Magento 2 安装目录>app/etc/env.php:
'cache' =>
array(
   'frontend' =>
   array(
      'default' =>
      array(
         'backend' => 'Cm_Cache_Backend_Redis',
         'backend_options' =>
         array(
            'server' => '127.0.0.1',
            'database' => '0',
            'port' => '6379'
            ),
    ),
    'page_cache' =>
    array(
      'backend' => 'Cm_Cache_Backend_Redis',
      'backend_options' =>
       array(
         'server' => '127.0.0.1',
         'port' => '6379',
         'database' => '1',
         'compress_data' => '0'
       )
    )
  )
),
基本验证
为了验证redis和Magento是一起工作的,使用下面的命令:
Redis监控命令
在服务器上使用运行命令提示符,输入 :
redis-cli monitor刷新您的店面页面,你会看到类似的输出如下.
Session 存储
如果你使用redis的Session存储,你会看到类似如下的输出 :
1476824834.187250 [0 127.0.0.1:52353] "select" "0"
1476824834.187587 [0 127.0.0.1:52353] "hmget" "sess_sgmeh2k3t7obl2tsot3h2ss0p1" "data" "writes"
1476824834.187939 [0 127.0.0.1:52353] "expire" "sess_sgmeh2k3t7obl2tsot3h2ss0p1" "1200"
1476824834.257226 [0 127.0.0.1:52353] "select" "0"
1476824834.257239 [0 127.0.0.1:52353] "hmset" "sess_sgmeh2k3t7obl2tsot3h2ss0p1" "data" "_session_validator_data|a:4:{s:11:\"remote_addr\";s:12:\"10.235.34.14\";s:8:\"http_via\";s:0:\"\";s:20:\"http_x_forwarded_for\";s:0:\"\";s:15:\"http_user_agent\";s:115:\"Mozilla/5.0 (Windows NT 10.0; Win64; x64) AppleWebKit/537.36 (KHTML, like Gecko) Chrome/53.0.2785.143 Safari/537.36\";}_session_hosts|a:1:{s:12:\"10.235.32.10\";b:1;}admin|a:0:{}default|a:2:{s:9:\"_form_key\";s:16:\"e331ugBN7vRjGMgk\";s:12:\"visitor_data\";a:3:{s:13:\"last_visit_at\";s:19:\"2016-10-18 21:06:37\";s:10:\"session_id\";s:26:\"sgmeh2k3t7obl2tsot3h2ss0p1\";s:10:\"visitor_id\";s:1:\"9\";}}adminhtml|a:0:{}customer_base|a:1:{s:20:\"customer_segment_ids\";a:1:{i:1;a:0:{}}}checkout|a:0:{}" "lock" "0"

... more ...
页面缓存
如果你使用redis缓存页面,你会看到类似如下的输出:
1476826133.810090 [0 127.0.0.1:52366] "select" "1"
1476826133.816293 [0 127.0.0.1:52367] "select" "0"
1476826133.817461 [0 127.0.0.1:52367] "hget" "zc:k:ea6_GLOBAL__DICONFIG" "d"
1476826133.829666 [0 127.0.0.1:52367] "hget" "zc:k:ea6_DICONFIG049005964B465901F774DB9751971818" "d"
1476826133.837854 [0 127.0.0.1:52367] "hget" "zc:k:ea6_INTERCEPTION" "d"
1476826133.868374 [0 127.0.0.1:52368] "select" "1"
1476826133.869011 [0 127.0.0.1:52369] "select" "0"
1476826133.869601 [0 127.0.0.1:52369] "hget" "zc:k:ea6_DEFAULT_CONFIG_CACHE_DEFAULT__10__235__32__1080MAGENTO2" "d"
1476826133.872317 [0 127.0.0.1:52369] "hget" "zc:k:ea6_INITIAL_CONFIG" "d"
1476826133.879267 [0 127.0.0.1:52369] "hget" "zc:k:ea6_GLOBAL_PRIMARY_PLUGIN_LIST" "d"
1476826133.883312 [0 127.0.0.1:52369] "hget" "zc:k:ea6_GLOBAL__EVENT_CONFIG_CACHE" "d"
1476826133.898431 [0 127.0.0.1:52369] "hget" "zc:k:ea6_DB_PDO_MYSQL_DDL_STAGING_UPDATE_1" "d"
1476826133.898794 [0 127.0.0.1:52369] "hget" "zc:k:ea6_RESOLVED_STORES_D1BEFA03C79CA0B84ECC488DEA96BC68" "d"
1476826133.905738 [0 127.0.0.1:52369] "hget" "zc:k:ea6_DEFAULT_CONFIG_CACHE_STORE_DEFAULT_10__235__32__1080MAGENTO2" "d"

... more ...

1476826210.634998 [0 127.0.0.1:52439] "hmset" "zc:k:ea6_MVIEW_CONFIG" "d" "a:18:{s:19:\"design_config_dummy\";a:4:{s:7:\"view_id\";s:19:\"design_config_dummy\";s:12:\"action_class\";s:39:\"Magento\\Theme\\Model\\Indexer\\Mview\\Dummy\";s:5:\"group\";s:7:\"indexer\";s:13:\"subscriptions\";a:0:{}}s:14:\"customer_dummy\";a:4:{s:7:\"view_id\";s:14:\"customer_dummy\";s:12:\"action_class\";s:42:\"Magento\\Customer\\Model\\Indexer\\Mview\\Dummy\";s:5:\"group\";s:7:\"indexer\";s:13:\"subscriptions\";a:0:{}}s:13:\"cms_page_grid\";a:4:{s:7:\"view_id\";s:13:\"cms_page_grid\";s:12:\"action_class\";s:43:\"Magento\\Catalog\\Model\\Indexer\\Category\\Flat\";s:5:\"group\";s:7:\"indexer\";s:13:\"subscriptions\";a:1:{s:8:\"cms_page\";a:3:{s:4:\"name\";s:8:\"cms_page\";s:6:\"column\";s:7:\"page_id\";s:18:\"subscription_model\";N;}}}s:21:\"catalog_category_flat\";a:4:{s:7:\"view_id\";s:21:\"catalog_category_flat\";s:12:\"action_class\";s:43:\"Magento\\Catalog\\Model\\Indexer\\Category\\Flat\";s:5:\"group\";s:7:\"indexer\";s:13:\"subscriptions\";a:6:{s:23:\"catalog_category_entity\";a:3:{s:4:\"name\";s:23:\"catalog_category_entity\";s:6:\"column\";s:9:\"entity_id\";s:18:\"subscription_model\";N;}s:31:\"catalog_category_entity_decimal\";a:3:{s:4:\"name\";s:31:\"catalog_category_entity_decimal\";s:6:\"column\";s:9:\"entity_id\";s:18:\"subscription_model\";s:71:\"Magento\\CatalogStaging\\Model\\Mview\\View\\Category\\Attribute\\Subscription\";}s:27:\"catalog_category_entity_int\";a:3:{s:4:\"name\";s:27:\"catalog_category_entity_int\";s:6:\"column\";s:9:\"entity_id\";s:18:\"subscription_model\";s:71:\"Magento\\CatalogStaging\\Model\\Mview\\View\\Category\\Attribute\\Subscription\";}s:28:\"catalog_category_entity_text\";a:3:{s:4:\"name\";s:28:\"catalog_category_entity_text\";s:6:\"column\";s:9:\"entity_id\";s:18:\"subscription_model\";s:71:\"Magento\\CatalogStaging\\Model\\Mview\\View\\Category\\Attribute\\Subscription\";}s:31:\"catalog_category_entity_varchar\";a:3:{s:4:\"name\";s:31:\"catalog_category_entity_varchar\";s:6:\"column\";s:9:\"entity_id\";s:18:\"subscription_model\";s:71:\"Magento\\CatalogStaging\\Model\\Mview\\View\\Category\\Attribute\\Subscription\";}s:32:\"catalog_category_entity_datetime\";a:3:{s:4:\"name\";s:32:\"catalog_category_entity_datetime\";s:6:\"column\";s:9:\"entity_id\";s:18:\"subscription_model\";s:71:\"Magento\\CatalogStaging\\Model\\Mview\\View\\Category\\Attribute\\Subscription\";}}}s:24:\"catalog_category_product\";a:4:{s:7:\"view_id\";s:24:\"catalog_category_product\";s:12:\"action_class\";s:46:\"Magento\\Catalog\\Model\\Indexer\\Category\\Product\";s:5:\"group\";s:7:\"indexer\";s:13:\"subscriptions\";a:2:{s:23:\"catalog_category_entity\";a:3:{s:4:\"name\";s:23:\"catalog_category_entity\";s:6:\"column\"

... more ...
Redis ping 命令
输入下面的命令:
redis-cli ping@Session 存储中使用Redis
先安装 Redis.你可以使用redis的会话存储Magento最低版本2.0.6。
Magento2 Session 存储使用 Redis 配置
以下添加到<Magento 2 安装目录>app/etc/env.php:
'session' =>
   array (
   'save' => 'redis',
   'redis' =>
      array (
	'host' => '127.0.0.1',
	'port' => '6379',
	'password' => '',
	'timeout' => '2.5',
	'persistent_identifier' => '',
	'database' => '2',
	'compression_threshold' => '2048',
	'compression_library' => 'gzip',
	'log_level' => '1',
	'max_concurrency' => '6',
	'break_after_frontend' => '5',
	'break_after_adminhtml' => '30',
	'first_lifetime' => '600',
	'bot_first_lifetime' => '60',
	'bot_lifetime' => '7200',
	'disable_locking' => '0',
	'min_lifetime' => '60',
	'max_lifetime' => '2592000'
    )
),
基本验证
为了验证redis和Magento是一起工作的,使用下面的命令:
Redis 监控命令
在服务器上使用运行命令提示符,输入:
redis-cli monitor刷新您的店面页面,你会看到类似的输出如下.
Session 存储
如果你使用redis的会话存储,你会看到类似如下的输出:
1476824834.187250 [0 127.0.0.1:52353] "select" "0"
1476824834.187587 [0 127.0.0.1:52353] "hmget" "sess_sgmeh2k3t7obl2tsot3h2ss0p1" "data" "writes"
1476824834.187939 [0 127.0.0.1:52353] "expire" "sess_sgmeh2k3t7obl2tsot3h2ss0p1" "1200"
1476824834.257226 [0 127.0.0.1:52353] "select" "0"
1476824834.257239 [0 127.0.0.1:52353] "hmset" "sess_sgmeh2k3t7obl2tsot3h2ss0p1" "data" "_session_validator_data|a:4:{s:11:\"remote_addr\";s:12:\"10.235.34.14\";s:8:\"http_via\";s:0:\"\";s:20:\"http_x_forwarded_for\";s:0:\"\";s:15:\"http_user_agent\";s:115:\"Mozilla/5.0 (Windows NT 10.0; Win64; x64) AppleWebKit/537.36 (KHTML, like Gecko) Chrome/53.0.2785.143 Safari/537.36\";}_session_hosts|a:1:{s:12:\"10.235.32.10\";b:1;}admin|a:0:{}default|a:2:{s:9:\"_form_key\";s:16:\"e331ugBN7vRjGMgk\";s:12:\"visitor_data\";a:3:{s:13:\"last_visit_at\";s:19:\"2016-10-18 21:06:37\";s:10:\"session_id\";s:26:\"sgmeh2k3t7obl2tsot3h2ss0p1\";s:10:\"visitor_id\";s:1:\"9\";}}adminhtml|a:0:{}customer_base|a:1:{s:20:\"customer_segment_ids\";a:1:{i:1;a:0:{}}}checkout|a:0:{}" "lock" "0"

... more ...
Page 缓存
如果你使用redis缓存页面,你会看到类似如下的输出:
1476826133.810090 [0 127.0.0.1:52366] "select" "1"
1476826133.816293 [0 127.0.0.1:52367] "select" "0"
1476826133.817461 [0 127.0.0.1:52367] "hget" "zc:k:ea6_GLOBAL__DICONFIG" "d"
1476826133.829666 [0 127.0.0.1:52367] "hget" "zc:k:ea6_DICONFIG049005964B465901F774DB9751971818" "d"
1476826133.837854 [0 127.0.0.1:52367] "hget" "zc:k:ea6_INTERCEPTION" "d"
1476826133.868374 [0 127.0.0.1:52368] "select" "1"
1476826133.869011 [0 127.0.0.1:52369] "select" "0"
1476826133.869601 [0 127.0.0.1:52369] "hget" "zc:k:ea6_DEFAULT_CONFIG_CACHE_DEFAULT__10__235__32__1080MAGENTO2" "d"
1476826133.872317 [0 127.0.0.1:52369] "hget" "zc:k:ea6_INITIAL_CONFIG" "d"
1476826133.879267 [0 127.0.0.1:52369] "hget" "zc:k:ea6_GLOBAL_PRIMARY_PLUGIN_LIST" "d"
1476826133.883312 [0 127.0.0.1:52369] "hget" "zc:k:ea6_GLOBAL__EVENT_CONFIG_CACHE" "d"
1476826133.898431 [0 127.0.0.1:52369] "hget" "zc:k:ea6_DB_PDO_MYSQL_DDL_STAGING_UPDATE_1" "d"
1476826133.898794 [0 127.0.0.1:52369] "hget" "zc:k:ea6_RESOLVED_STORES_D1BEFA03C79CA0B84ECC488DEA96BC68" "d"
1476826133.905738 [0 127.0.0.1:52369] "hget" "zc:k:ea6_DEFAULT_CONFIG_CACHE_STORE_DEFAULT_10__235__32__1080MAGENTO2" "d"

... more ...

1476826210.634998 [0 127.0.0.1:52439] "hmset" "zc:k:ea6_MVIEW_CONFIG" "d" "a:18:{s:19:\"design_config_dummy\";a:4:{s:7:\"view_id\";s:19:\"design_config_dummy\";s:12:\"action_class\";s:39:\"Magento\\Theme\\Model\\Indexer\\Mview\\Dummy\";s:5:\"group\";s:7:\"indexer\";s:13:\"subscriptions\";a:0:{}}s:14:\"customer_dummy\";a:4:{s:7:\"view_id\";s:14:\"customer_dummy\";s:12:\"action_class\";s:42:\"Magento\\Customer\\Model\\Indexer\\Mview\\Dummy\";s:5:\"group\";s:7:\"indexer\";s:13:\"subscriptions\";a:0:{}}s:13:\"cms_page_grid\";a:4:{s:7:\"view_id\";s:13:\"cms_page_grid\";s:12:\"action_class\";s:43:\"Magento\\Catalog\\Model\\Indexer\\Category\\Flat\";s:5:\"group\";s:7:\"indexer\";s:13:\"subscriptions\";a:1:{s:8:\"cms_page\";a:3:{s:4:\"name\";s:8:\"cms_page\";s:6:\"column\";s:7:\"page_id\";s:18:\"subscription_model\";N;}}}s:21:\"catalog_category_flat\";a:4:{s:7:\"view_id\";s:21:\"catalog_category_flat\";s:12:\"action_class\";s:43:\"Magento\\Catalog\\Model\\Indexer\\Category\\Flat\";s:5:\"group\";s:7:\"indexer\";s:13:\"subscriptions\";a:6:{s:23:\"catalog_category_entity\";a:3:{s:4:\"name\";s:23:\"catalog_category_entity\";s:6:\"column\";s:9:\"entity_id\";s:18:\"subscription_model\";N;}s:31:\"catalog_category_entity_decimal\";a:3:{s:4:\"name\";s:31:\"catalog_category_entity_decimal\";s:6:\"column\";s:9:\"entity_id\";s:18:\"subscription_model\";s:71:\"Magento\\CatalogStaging\\Model\\Mview\\View\\Category\\Attribute\\Subscription\";}s:27:\"catalog_category_entity_int\";a:3:{s:4:\"name\";s:27:\"catalog_category_entity_int\";s:6:\"column\";s:9:\"entity_id\";s:18:\"subscription_model\";s:71:\"Magento\\CatalogStaging\\Model\\Mview\\View\\Category\\Attribute\\Subscription\";}s:28:\"catalog_category_entity_text\";a:3:{s:4:\"name\";s:28:\"catalog_category_entity_text\";s:6:\"column\";s:9:\"entity_id\";s:18:\"subscription_model\";s:71:\"Magento\\CatalogStaging\\Model\\Mview\\View\\Category\\Attribute\\Subscription\";}s:31:\"catalog_category_entity_varchar\";a:3:{s:4:\"name\";s:31:\"catalog_category_entity_varchar\";s:6:\"column\";s:9:\"entity_id\";s:18:\"subscription_model\";s:71:\"Magento\\CatalogStaging\\Model\\Mview\\View\\Category\\Attribute\\Subscription\";}s:32:\"catalog_category_entity_datetime\";a:3:{s:4:\"name\";s:32:\"catalog_category_entity_datetime\";s:6:\"column\";s:9:\"entity_id\";s:18:\"subscription_model\";s:71:\"Magento\\CatalogStaging\\Model\\Mview\\View\\Category\\Attribute\\Subscription\";}}}s:24:\"catalog_category_product\";a:4:{s:7:\"view_id\";s:24:\"catalog_category_product\";s:12:\"action_class\";s:46:\"Magento\\Catalog\\Model\\Indexer\\Category\\Product\";s:5:\"group\";s:7:\"indexer\";s:13:\"subscriptions\";a:2:{s:23:\"catalog_category_entity\";a:3:{s:4:\"name\";s:23:\"catalog_category_entity\";s:6:\"column\"

... more ...
Redis ping 命令
输入下面的命令:
redis-cli ping等等
七 配置和使用Varnish
Varnish 解决方案概述
Varnish 缓存是一个开放源代码的Web应用程序加速器.
Magento 2 支持Varnish 3.0.5以上的版本.
magento 2 强烈建议使用Varnish 代替默认的. full-page 缓存,因为他比默认的缓存快很多。
Varnish 解析图
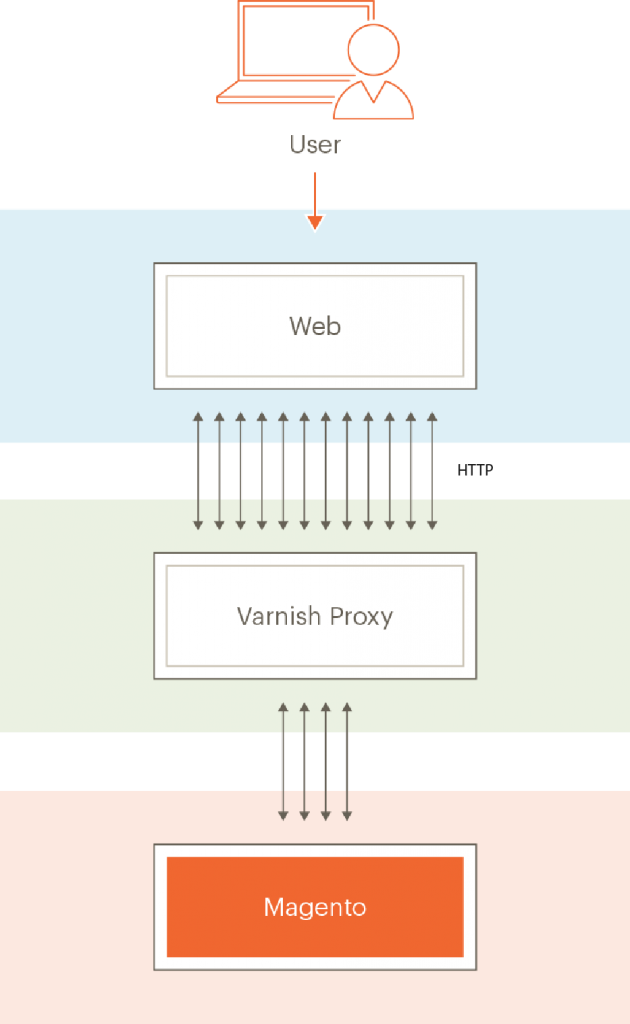
过程概述
本主题讨论如何使用最少的参数和测试来安装Varnish。然后你可以从Magento 2后台导出一个Varnish配置。
这个过程可以概括如下:
通过访问任何magento页面如果你得到HTTP响应头表明Varnish工作测试成功
安装magento 2 登录后台创建一个Varnish 配置文件.
覆盖原先的Varnish配置文件.
再次测试一切。
如过 <Magento 2 安装目录>/var/page_cache 目录下面什么都没有,表示Varnish 配置成功!
@安装Varnish
有关安装Varnish的更多信息,请网上搜索教程。
确认你的Varnish版本
输入下面的命令:
varnishd -V
示例:
varnishd (varnish-4.0.3 revision b8c4a34)
Copyright (c) 2006 Verdens Gang AS
Copyright (c) 2006-2014 Varnish Software AS
@配置Varnish 和 web服务器
配置您的web服务器
配置Web服务器监听默认端口80以外的端口,因为Varnish直接响应传入的HTTP请求,而不是web服务器。
在后面的章节中,我们使用端口8080作为一个例子.
改变Apache 2.2监听端口:
- 打开
/etc/httpd/conf/httpd.conf在文本编辑器中. - 查找
Listen指令. - 将端口的值更改为
8080. - 保存更改
httpd.conf.
修改Varnish系统配置
- 打开
/etc/sysconfig/varnish(或/etc/default/varnish在 Debian 和 Ubuntu) 在文本编辑器中. - 设置Varnish 端口为 80:
VARNISH_LISTEN_PORT=80
3. ## Alternative 1, Minimal configuration, no VCL
#DAEMON_OPTS="-a :6081 \
#             -T localhost:6082 \
#             -b localhost:8080 \
#             -u varnish -g varnish \
#             -s file,/var/lib/varnish/varnish_storage.bin,1G"
## Alternative 2, Configuration with VCL
#DAEMON_OPTS="-a :6081 \
#             -T localhost:6082 \
#             -f /etc/varnish/default.vcl \
#             -u varnish -g varnish \
#             -S /etc/varnish/secret \
#             -s file,/var/lib/varnish/varnish_storage.bin,1G"
4.保存更改
/etc/sysconfig/varnish@配置Magento 2使用Varnish
配置Magento使用Varnish :
- 用管理员身份登录magento 2.
- 点击 STORES > Configuration > ADVANCED > System > Full Page Cache
- 从缓存应用列表中点击Varnish 缓存
- 点击 保存配置.
- 单击一个导出按钮以创建
default.vcl你可以使用 Varnish.
如果使用Varnish 4, 点击 Export VCL for Varnish 4
如下图:

- 代替之前的
default.vcl
@最后的验证
验证HTTP响应头
当你访问magento页面时使用curl或其他工具查看HTTP响应头
确保你使用的magento 2 开发者模式; 否则,你将无法看到。
例如,
curl -I -v --location-trusted 'http://192.0.2.55/magento2'X-Magento-Cache-Control: max-age=86400, public, s-maxage=86400
Age: 0
X-Magento-Cache-Debug: MISS@503(Backend Fetch Failed后端获取失败)
如果Magento2缓存标签使用长度超过8192个字符,你可以看到HTTP 503(后台读取失败)在浏览器中的错误。这些错误可能显示如下:
Error 503 Backend fetch failed
Backend fetch failed
为了解决这个问题,修改varnish配置文件如下:
- 用
root用户打开:- CentOS 6:
/etc/sysconfig/varnish - CentOS 7:
/etc/varnish/varnish.params - Ubuntu:
/etc/default/varnish
- CentOS 6:
- 搜索
http_resp_hdr_len参数. - 如果参数不存在增加
thread_pool_max. - 设置
http_resp_hdr_len示例:-p http_resp_hdr_len=64000 \代码片段:
# DAEMON_OPTS is used by the init script.
DAEMON_OPTS="-a ${VARNISH_LISTEN_ADDRESS}:${VARNISH_LISTEN_PORT} \
     -f ${VARNISH_VCL_CONF} \
     -T ${VARNISH_ADMIN_LISTEN_ADDRESS}:${VARNISH_ADMIN_LISTEN_PORT} \
     -p thread_pool_min=${VARNISH_MIN_THREADS} \
     -p thread_pool_max=${VARNISH_MAX_THREADS} \
     -p http_resp_hdr_len=64000 \
     -S ${VARNISH_SECRET_FILE} \
     -s ${VARNISH_STORAGE}"
八 Magento 2多个网站或商店
Magento 2多个网站或商店介绍
Magento 2安装一套程序可以让你启动多个网站或商店,使用不同的视图:
不同的语言
不同的域名
不同的产品分类
这种灵活的解决方案使一套Magento后台程序管理和显示不同的商店.
@后台设置多个网站,商店和商店视图
1: 创建产品根目录
- 登录到Magento 2后台.
- 点击 Products > Categories.
- 点击 Add Root Category.
- 在 Category Name 输入分类名称.
- 确保 Enable Category 设置 Yes.如下图:

- 点击 Save.
2: 创建 websites(网站)
- 点击 Stores > 设置 > All Stores.
- 在商店页面, 点击 Create Website.
- Name 字段: 输入网站名称.
- Code 字段: 输入唯一标识
- Sort Order 字段: 设置一个数字网站排序.
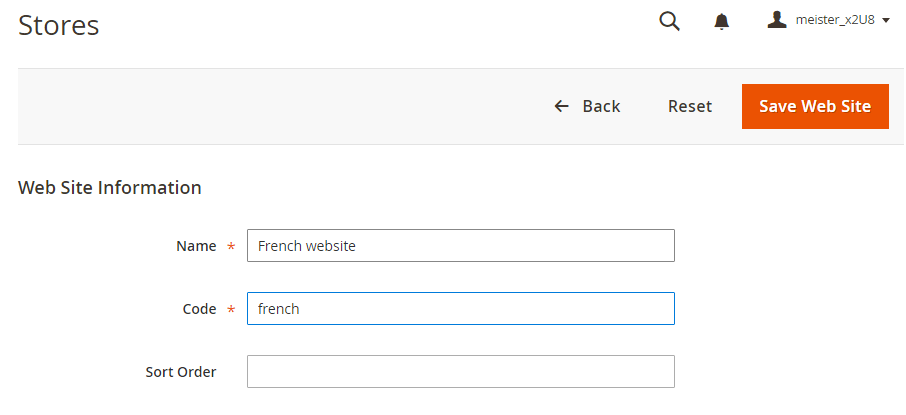
- 点击 Save Web Site.
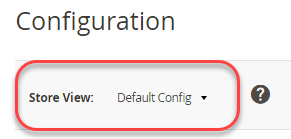
3: 创建商店
- 点击 Stores > 设置 > All Stores.
- 在商店页面, 点击 Create Store.如下图:
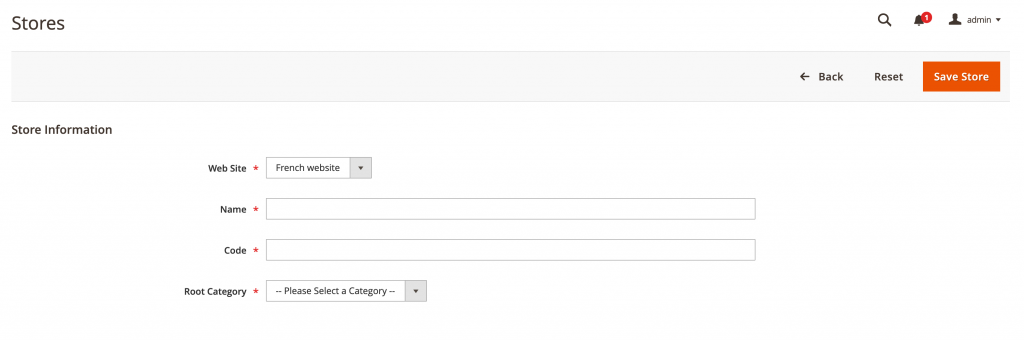
- 点击 Save Store.
4: 创建商店视图
- 点击 Stores > 设置 > All Stores.
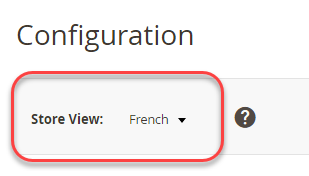
- 在商店页面, 点击 Create Store.如下图:
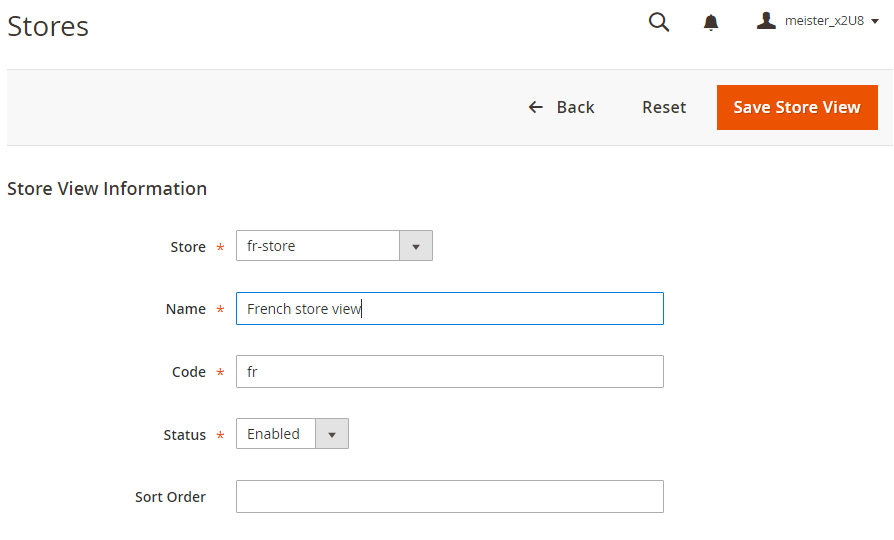
- 点击 Save Store View.
5: 更改网站的基础网址
- 在管理页面, 点击 Stores > 设置 > Configuration > General > Web.
- 点击 Save Config.
6: 添加商店code

- 点击 Save Config.
九 设置自定义定时任务(cron)和计划组(cron group)
@配置自定义定时任务(cron )和计划组(cron group)教程
本教程教你一步一步的创建一个自定义的cron job(定时任务),任选一个cron group。
1: 获取示例模块
- 登录到magento服务器,切换到 Magento 2文件系统所有者.
- 克隆 magento2 样本库.示例
cd ~
git clone git@github.com:magento/magento2-samples.git
创建一个目录来拷贝示例代码:
mkdir -p /var/www/html/magento2/app/code/Magento/SampleMinimal复制示例模块代码
cp -r ~/magento2-samples/sample-module-minimal/* /var/www/html/magento2/app/code/Magento/SampleMinimal验证文件是否正确复制
ls -al /var/www/html/magento2/app/code/Magento/SampleMinimalYou should see the following result:
drwxrwsr-x.   4 magento_user apache  4096 Oct 30 13:19 .
drwxrwsr-x. 121 magento_user apache  4096 Oct 30 13:19 ..
-rw-rw-r--.   1 magento_user apache   372 Oct 30 13:19 composer.json
drwxrwsr-x.   2 magento_user apache  4096 Oct 30 13:19 etc
-rw-rw-r--.   1 magento_user apache 10376 Oct 30 13:19 LICENSE_AFL.txt
-rw-rw-r--.   1 magento_user apache 10364 Oct 30 13:19 LICENSE.txt
-rw-rw-r--.   1 magento_user apache  1157 Oct 30 13:19 README.md
-rw-rw-r--.   1 magento_user apache   270 Oct 30 13:19 registration.php
drwxrwsr-x.   3 magento_user apache  4096 Oct 30 13:19 Test
更新Magento 2 数据库和schema:
php /var/www/html/magento2/bin/magento setup:upgrade: 验证样本模块
- 用管理员身份登录magento 2后台
- 点击 Stores > Configuration > ADVANCED > Advanced.
创建一个类来运行cron
- 为类创建目录并更改目录:
mkdir /var/www/html/magento2/app/code/Magento/SampleMinimal/Cron && cd /var/www/html/magento2/app/code/Magento/SampleMinimal/Cron 在目录中创建了一个名为Test.php的文件:
<?php
namespace Magento\SampleMinimal\Cron;
use \Psr\Log\LoggerInterface;

class Test {
    protected $logger;

    public function __construct(LoggerInterface $logger) {
        $this->logger = $logger;
    }

/**
   * Write to system.log
   *
   * @return void
   */

    public function execute() {
        $this->logger->info('Cron Works');
    }

}
4: 创建crontab.xml
在/var/www/html/magento2/app/code/Magento/SampleMinimal/etc目录创建crontab.xml:
<?xml version="1.0"?>
<config xmlns:xsi="http://www.w3.org/2001/XMLSchema-instance" xsi:noNamespaceSchemaLocation="urn:magento:module:Magento_Cron:etc/crontab.xsd">
    <group id="default">
        <job name="custom_cronjob" instance="Magento\SampleMinimal\Cron\Test" method="execute">
            <schedule>* * * * *</schedule>
        </job>
    </group>
</config>
5: 验证cron job
- 运行 Magento cron jobs:
php /var/www/html/magento2/bin/magento cron:run- 输入
magento cron:run命令 - 运行查询sql
SELECT * from cron_schedule WHERE job_code like '%custom%'如下:- 输入
mysql -u magento -p - 输入
use magento; - 输入
SELECT * from cron_schedule WHERE job_code like '%custom%';
- 输入
+-------------+----------------+---------+----------+---------------------+---------------------+---------------------+---------------------+
| schedule_id | job_code       | status  | messages | created_at          | scheduled_at        | executed_at         | finished_at         |
+-------------+----------------+---------+----------+---------------------+---------------------+---------------------+---------------------+
|        3670 | custom_cronjob | success | NULL     | 2016-11-02 09:38:03 | 2016-11-02 09:38:00 | 2016-11-02 09:39:03 | 2016-11-02 09:39:03 |
|        3715 | custom_cronjob | success | NULL     | 2016-11-02 09:53:03 | 2016-11-02 09:53:00 | 2016-11-02 09:54:04 | 2016-11-02 09:54:04 |
|        3758 | custom_cronjob | success | NULL     | 2016-11-02 10:09:03 | 2016-11-02 10:09:00 | 2016-11-02 10:10:03 | 2016-11-02 10:10:03 |
|        3797 | custom_cronjob | success | NULL     | 2016-11-02 10:24:03 | 2016-11-02 10:24:00 | 2016-11-02 10:25:03 | 2016-11-02 10:25:03 |
+-------------+----------------+---------+----------+---------------------+---------------------+---------------------+---------------------+
设置自定义 cron group
- 打开
crontab.xml在文本编辑器. - 更改
<group id="default">为<group id="custom_crongroup"> - 保存.
- 创建
/var/www/html/magento2/app/code/Magento/SampleMinimal/etc/cron_groups.xml具有以下内容:
<?xml version="1.0"?>
<config xmlns:xsi="http://www.w3.org/2001/XMLSchema-instance" xsi:noNamespaceSchemaLocation="urn:magento:module:Magento_Cron:etc/cron_groups.xsd">
    <group id="custom_crongroup">
        <schedule_generate_every>1</schedule_generate_every>
        <schedule_ahead_for>4</schedule_ahead_for>
        <schedule_lifetime>2</schedule_lifetime>
        <history_cleanup_every>10</history_cleanup_every>
        <history_success_lifetime>60</history_success_lifetime>
        <history_failure_lifetime>600</history_failure_lifetime>
    </group>
</config>
7: 验证 cron group
- 运行cron job 在Magento自定义组:
php /var/www/html/magento2/bin/magento cron:run --group="custom_crongroup"- 至少运行两次命令。
- 清除magento 2缓存:
php /var/www/html/magento2/bin/magento cache:clean- 用管理员身份登录到后台.
- 点击 Stores > Configuration > Advanced > System.
- 在右窗格中展开 Cron.
十 配置数据库分析器(profiler)
关于数据库分析器(profiler)
Magento数据库分析器显示页面上执行的所有查询,包括每个查询的时间和什么样的参数被执行。
1: 修改部署配置
修改<Magento 2 安装目录>/app/etc/env.php将下列代码添加到 magento2/blob/2.0/lib/internal/Magento/Framework/DB/Profiler.php:
        'profiler' => [
            'class' => '\Magento\Framework\DB\Profiler',
            'enabled' => true,
        ],
示例如下:
 'db' =>
  array (
    'table_prefix' => '',
    'connection' =>
    array (
      'default' =>
      array (
        'host' => 'localhost',
        'dbname' => 'magento',
        'username' => 'magento',
        'password' => 'magento',
        'model' => 'mysql4',
        'engine' => 'innodb',
        'initStatements' => 'SET NAMES utf8;',
        'active' => '1',
        'profiler' => [
            'class' => '\Magento\Framework\DB\Profiler',
            'enabled' => true,
        ],
      ),
    ),
  ),
2: 配置输出
/** @var \Magento\Framework\App\ResourceConnection $res */
$res = \Magento\Framework\AppObjectManager::getInstance()->get('Magento\Framework\App\ResourceConnection');
/** @var Magento\Framework\DB\Profiler $profiler */
$profiler = $res->getConnection('read')->getProfiler();
echo "<table cellpadding='0' cellspacing='0' border='1'>";
echo "<tr>";
echo "<th>Time <br/>[Total Time: ".$profiler->getTotalElapsedSecs()." secs]</th>";
echo "<th>SQL [Total: ".$profiler->getTotalNumQueries()." queries]</th>";
echo "<th>Query Params</th>";
echo "</tr>";
foreach ($profiler->getQueryProfiles() as $query) {
    /** @var Zend_Db_Profiler_Query $query*/
    echo '<tr>';
    echo '<td>', number_format(1000 * $query->getElapsedSecs(), 2), 'ms', '</td>';
    echo '<td>', $query->getQuery(), '</td>';
    echo '<td>', json_encode($query->getQueryParams()), '</td>';
    echo '</tr>';
}
echo "</table>";
3: 查看输出结果
十一 自定义日志
日志概述
日志提供可见性Magento系统过程;例如,调试信息,帮助您了解当发生错误或什么导致的误差。
本课题重点研究基于文件的记录,虽然Magento提供了灵活性,存储在数据库。
@Magento2日志的更多细节
Monolog
Magento 2 使用 PSR-3 标准. By default默认情况下, Magento 2 使用 Monolog. Monolog 实现 Psr\Log\LoggerInterface接口,在di.xml配置文件中.
开始使用日志
要开始使用日志,您必须得到 \Psr\Logger\LoggerInterface
示例 – 数据库日志活动
记录数据库日志,使用Magento\Framework\DB\LoggerInterface, 其中有两种实现方案:
Logs nothing (默认): Magento\Framework\DB\Logger\Quiet
日志保存在 var/log 目录: Magento\Framework\DB\Logger\File
添加下面的块以配置基于文件的日志:
<type name=”Magento\Framework\DB\Logger\File”>
<arguments>
<argument name=”logAllQueries” xsi:type=”boolean”>true</argument>
<argument name=”debugFile” xsi:type=”string”>log/db.log</argument>
</arguments>
</type>
另一种方式如下:
class SomeModel
{
private $logger;

public function __construct(\Psr\Logger\LoggerInterface $logger)
{
$this->logger = $logger;
}

public function doSomething()
{
try {
//do something
} catch (\Exception $e) {
$this->logger->critical(‘Error message’, [‘exception’ => $e]);
}
}
}
十二 如何定位session文件
定位你的Session 存储
本主题讨论如何定位会话文件的存储位置。Magento的应用程序使用以下逻辑存储会话文件:
如果你配置redis,会话存储在redis服务器;
如果使用的是默认的 file-based Session 存储,session文件存储如下:
目录定义在 env.php
目录定义在 php.ini
<Magento 2 安装目录>/var/session 目录
env.php 示例
<Magento 2 安装目录>/app/etc/env.php 示例代码片段:
‘session’ =>
array (
‘save’ => ‘files’,
‘save_path’ => ‘/var/www/session’,
),
前面的示例存储会话文件在 /var/www/session
php.ini 示例
打开php.ini 文件,查找 session.save_path.
十三 Magento 2的生产(上线)部署
本主题提供了在生产服务器上使用命令行部署更新Magento 2。
推荐使用系统升级在Magento 2系统管理中.
你安装Magento使用 Composer 或 compressed archive.
@部署步骤
- 登录到magento 2服务器,切换到Magento 2文件系统所有者.
- 改变目录到Magento安装目录:
cd <Magento安装目录>- 使用命令启用维护(maintenance)模式:
php bin/magento maintenance:enable - 更新magento 2:
composer require <package> <version> --no-update示例:magento/product-community-editionmagento/product-enterprise-edition
- 更新magento2 组件:
composer update - 更新数据库结构和数据:
php bin/magento setup:upgrade - 编译代码:
php bin/magento setup:di:compile - 部署静态内容 :
php bin/magento setup:static-content:deploy - 退出:
php bin/magento maintenance:disable
来源: 蓝文资源库