
上一篇文章,我们讲解了开发function的环境要求,环境搭建好后,开发的命令和代码都差不多的
需求:
比如:我在产品详情页通过编写代码增加了多个选项,通过JS监控客户点击那些选项后,实时把价格计算出来,然后传递到加入购物车的表单中。价格传递代码如下:
{% comment %} 找到现有的产品表单 {% endcomment %}
<form method="post" action="/cart/add" id="product-form-{{ section.id }}" accept-charset="UTF-8" class="form" enctype="multipart/form-data">

  {% comment %} 现有字段 {% endcomment %}
  <input type="hidden" name="id" value="{{ product.selected_or_first_available_variant.id }}">

  {% comment %} 添加自定义价格字段 {% endcomment %}
  <input type="hidden" name="properties[_custom_price]" id="custom-price-field" value="50">

  {% comment %} 可选:显示附加价格信息 {% endcomment %}
  <div class="custom-price-info">
    <p>附加定制费用: $<span id="custom-price-display">50.00</span></p>
  </div>

  {% comment %} 数量选择器 {% endcomment %}
  <div class="product-form__input product-form__quantity">
    <label for="Quantity-{{ section.id }}">数量</label>
    <input type="number" name="quantity" id="Quantity-{{ section.id }}" value="1" min="1">
  </div>

  {% comment %} 添加到购物车按钮 {% endcomment %}
  <button type="submit" name="add" class="product-form__submit button">
    <span>加入购物车</span>
  </button>
</form>
把计算好的价格传递到<input type="hidden" name="properties[_custom_price]" id="custom-price-field" value="传递的价格">
我需要编写一个Function的应用读取到properties[_custom_price]的价格,然后替代当前产品的价格,从而达到更改购物车金额的要求
下面是开发流程:
1.安装 Shopify CLI:
npm install -g @shopify/cli @shopify/app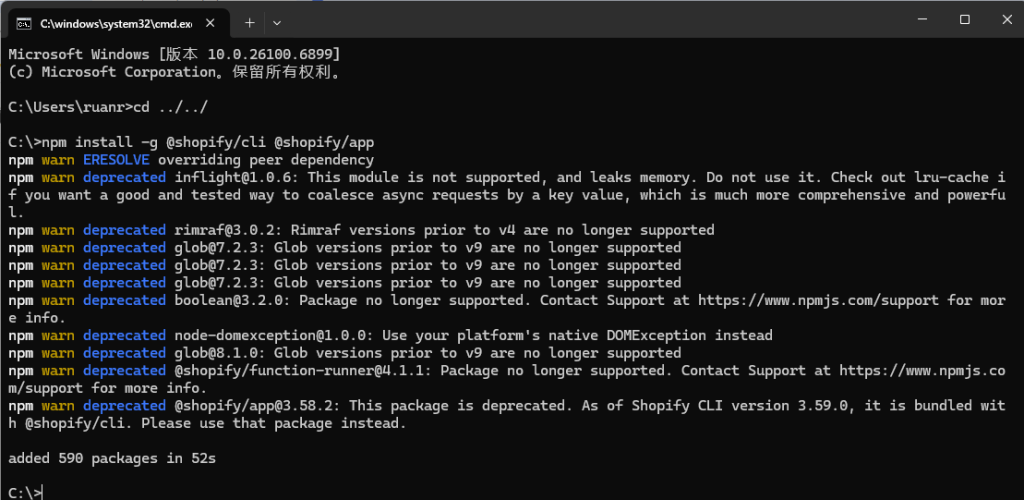
Shopify CLI 将命令按主题分组。命令语法为:shopify [topic] [command]。请参阅侧边栏中每个主题部分,查看可用命令列表。
或者,help在终端中运行命令即可获取此信息
2.开始安装步骤
1.创建新的 Shopify App,注意,一定要提前注册好合作伙伴开发者账号,并且创建开发者商店
# 创建新的 Shopify App
npm init @shopify/app@latest

# 按提示输入:
# - App name: test-function-cart-price (或你的名称)
# - Template: Remix
# - Language: TypeScript 或 JavaScript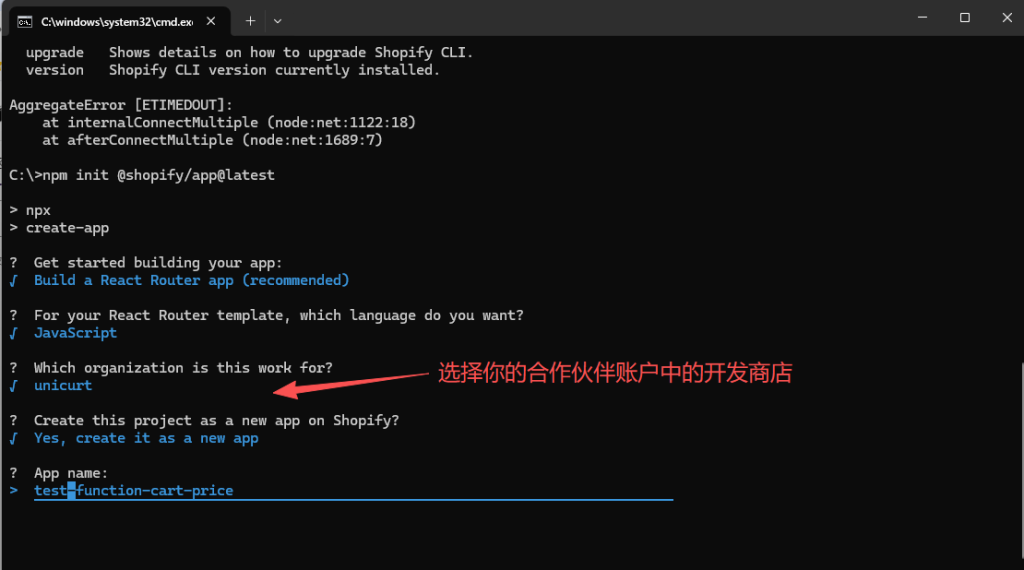
提示完成,这时你打开你的文件夹中会出现一个test-function-cart-price的文件夹,我这里是C盘
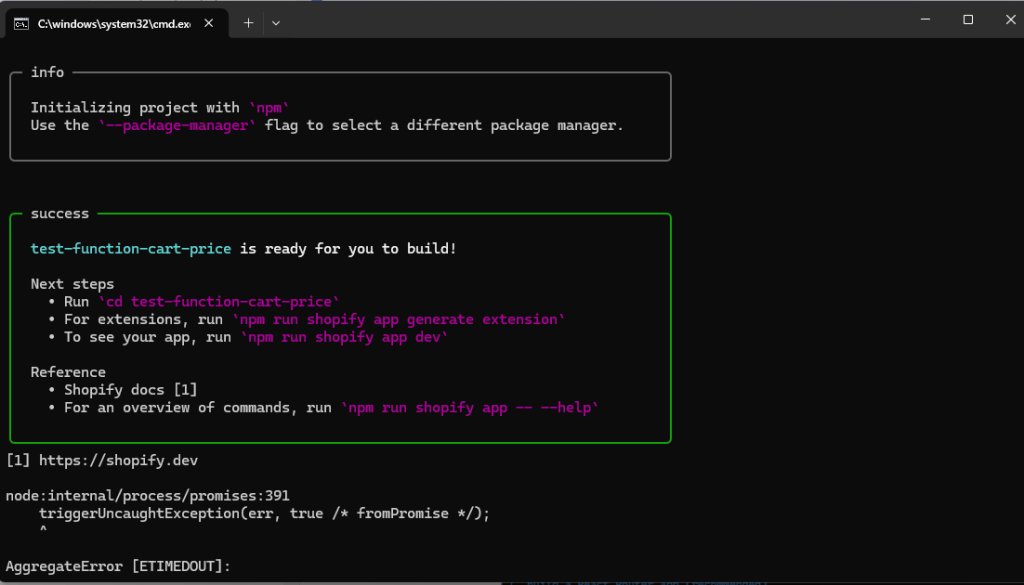
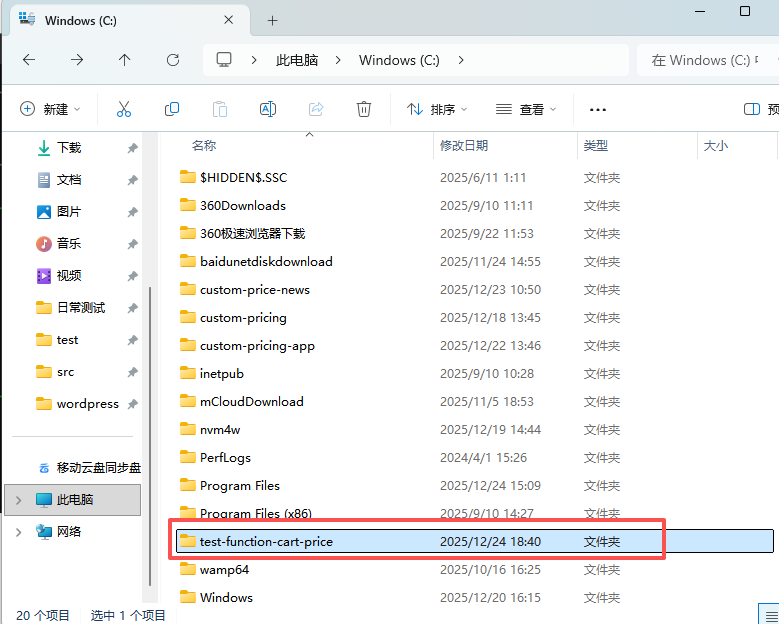
2.进入test-function-cart-price文件中,执行安装依赖
cd test-function-cart-price
npm install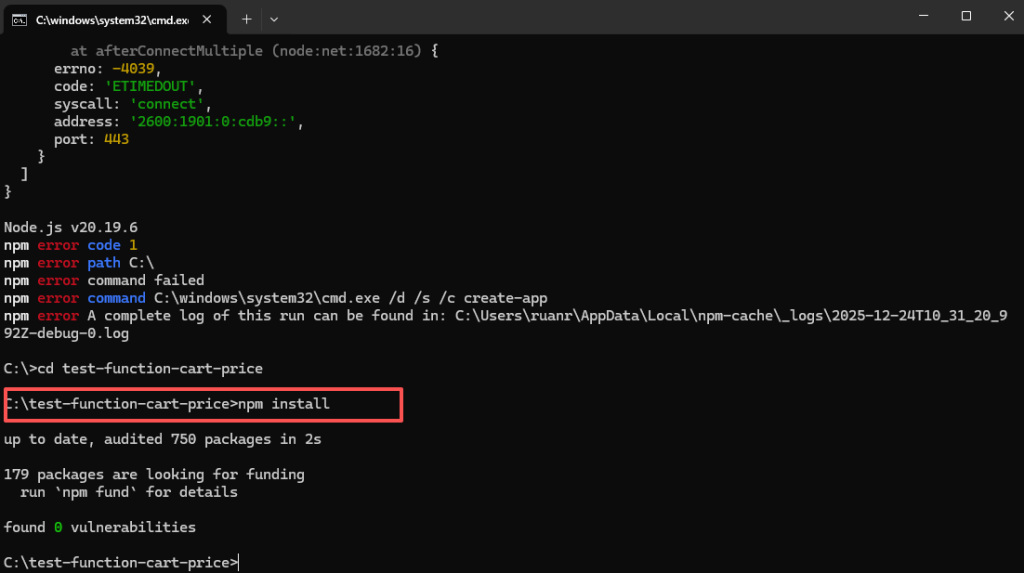
3.生成 Cart Transform Extension,这里是生成Function的重要步骤,选择你要使用的函数,我的需求要更改覆盖价格,所以我选择Cart Transform函数,每个函数对应一个文件夹,所以要创建对应的文件夹,代码选择JS,你也可以选择其他的
运行命令:
npm run shopify app generate extension

选择:
• Extension type: Function - Cart Transform
• Name: cart-price-adjustment
• Language: JavaScript 或 TypeScript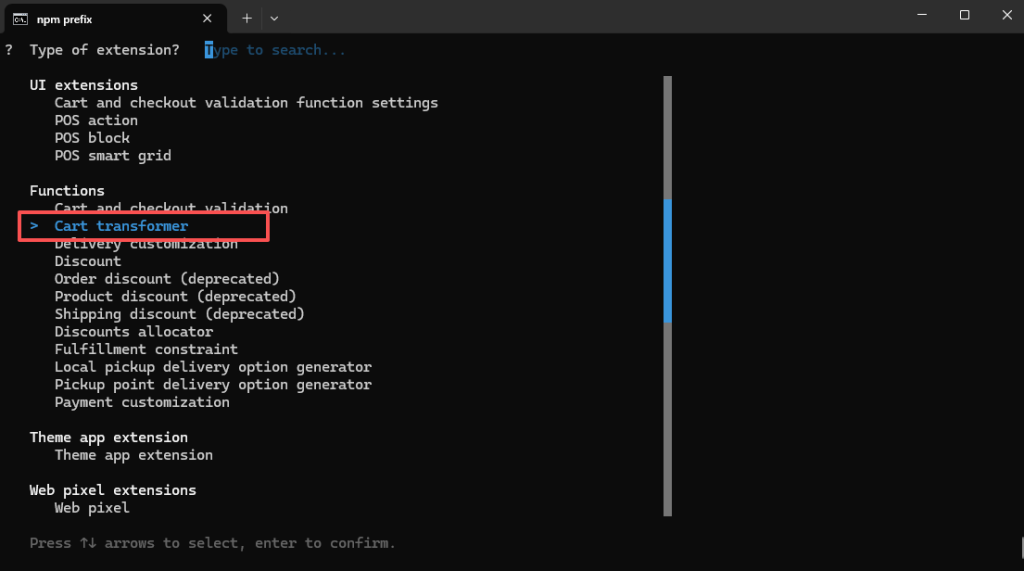
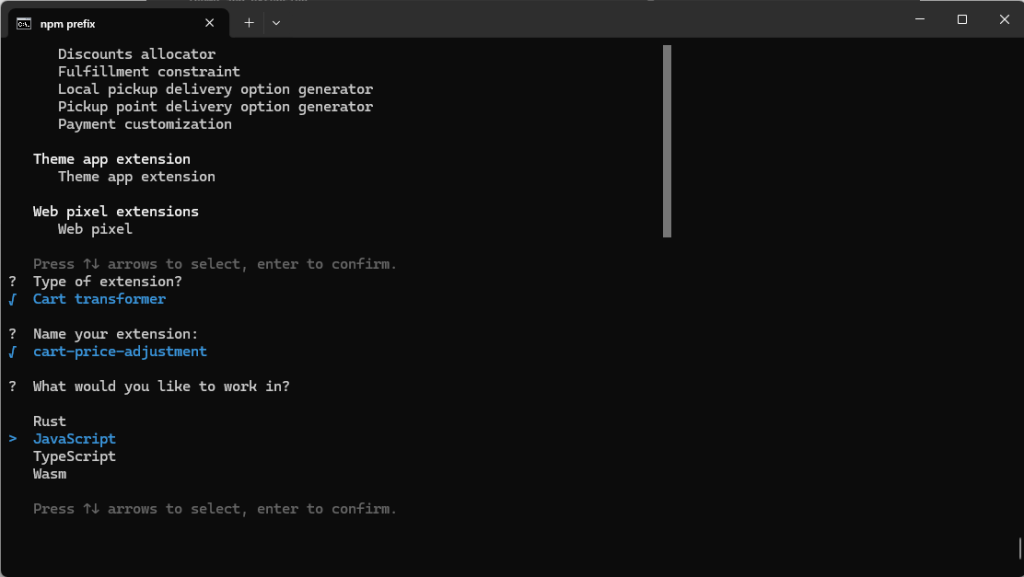
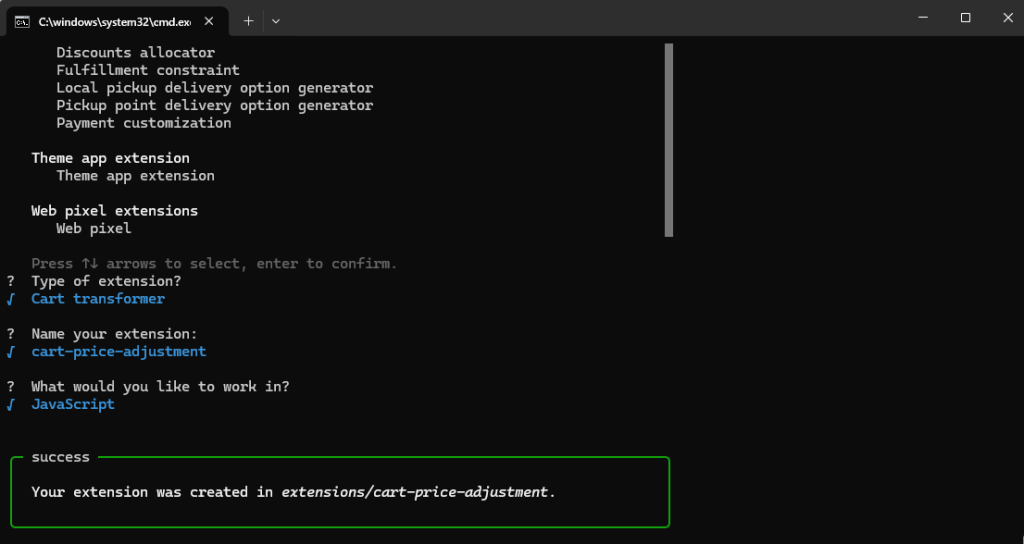

如果上面的命令运行一切顺利,那么在你的文件中就生成了使用Cart Transform函数的文件
下面我们围绕Cart Transform生成的文件来进行开发
文件中,核心的文件就几个
1.App 配置,配置APP的权限,APP使用的API版本等
C:\test-function-cart-price\shopify.app.toml
我们的需求是更改购物车的价格,权限需要写入购物车的权限 write_cart_transforms,版本选择25-10
# Learn more about configuring your app at https://shopify.dev/docs/apps/tools/cli/configuration

client_id = "自动生成的id"
name = "test-function-cart-price"
application_url = "https://example.com"
embedded = true

[build]
automatically_update_urls_on_dev = true
include_config_on_deploy = true

[webhooks]
api_version = "2025-10"

  [[webhooks.subscriptions]]
  topics = [ "app/uninstalled" ]
  uri = "/webhooks/app/uninstalled"

  [[webhooks.subscriptions]]
  topics = [ "app/scopes_update" ]
  uri = "/webhooks/app/scopes_update"

[access_scopes]
# Learn more at https://shopify.dev/docs/apps/tools/cli/configuration#access_scopes
scopes = "write_products,write_cart_transforms"

[auth]
redirect_urls = [ "https://example.com/api/auth" ]
2.扩展配置,配置Cart Transform扩展需要引用那些文件,扩展api版本之类的
C:\test-function-cart-price\extensions\cart-price-adjustment\shopify.extension.toml
api_version = "2025-07"

[[extensions]]
name = "t:name"
handle = "cart-price-adjustment"
type = "function"
uid = "自动生成的ID"
description = "t:description"

  [[extensions.targeting]]
  target = "cart.transform.run"
  input_query = "src/cart_transform_run.graphql"
  export = "cart-transform-run"

  [extensions.build]
  command = "npm run build"
  path = "dist/function.wasm"

  [extensions.ui.paths]
  create = "/"
  details = "/"

  [extensions.ui]
  enable_create = true
3.扩展依赖,从shopify查询数据,相当于数据库sql的存在,我们一般称之为model类似的东西,如果你用AI生成代码时,他们里面的run.graphql,指的就是这个文件,我这个名称是shopify自动生成的
C:\test-function-cart-price\extensions\cart-price-adjustment\src\cart_transform_run.graphql
下面的代码,我从shopify查询是否有key为_custom_price的值
query CartTransformRunInput {
  cart {
    lines {
      id
      quantity
      cost {
        amountPerQuantity {
          amount
        }
      }
      merchandise {
        ... on ProductVariant {
          id
          title
          product {
            id
            title
          }
        }
      }
      attribute(key: "_custom_price") {
        key
        value
      }
    }
  }
}
4.主要逻辑,核心代码,从这里处理代码的逻辑,AI喜欢把这个文件改成run.js
C:\test-function-cart-price\extensions\cart-price-adjustment\src\cart_transform_run.js
下面代码我会获取产品的原价和我传递隐藏框的附加价格,最终把两个价格相加后的价格加入购物车中
// @ts-check

/**
 * @typedef {import("../generated/api").CartTransformRunInput} CartTransformRunInput
 * @typedef {import("../generated/api").CartTransformRunResult} CartTransformRunResult
 */

/**
 * @type {CartTransformRunResult}
 */
const NO_CHANGES = {
  operations: [],
};

/**
 * @param {CartTransformRunInput} input
 * @returns {CartTransformRunResult}
 */
export function cartTransformRun(input) {
  // 存储所有价格调整操作
  const operations = [];

  // 遍历购物车中的所有行项目
  input.cart.lines.forEach((line) => {
    // 查找 _custom_price 属性
    const customPriceAttribute = line.attribute?.find(
      (attr) => attr.key === "_custom_price"
    );

    // 如果找到自定义价格属性
    if (customPriceAttribute && customPriceAttribute.value) {
      const additionalPrice = parseFloat(customPriceAttribute.value);

      // 验证价格有效性
      if (!isNaN(additionalPrice) && additionalPrice > 0) {
        // 获取当前单价
        const currentPricePerUnit = parseFloat(
          line.cost.amountPerQuantity.amount
        );

        // 计算新价格 = 原价 + 附加价格
        const newPricePerUnit = currentPricePerUnit + additionalPrice;

        // 添加价格调整操作
        operations.push({
          update: {
            cartLineId: line.id,
            price: {
              adjustment: {
                fixedPricePerUnit: {
                  amount: newPricePerUnit.toFixed(2),
                },
              },
            },
          },
        });

        // 可选:添加调试信息(在开发环境查看)
        console.error(
          `Line ${line.id}: Original ${currentPricePerUnit}, Additional ${additionalPrice}, New ${newPricePerUnit}`
        );
      }
    }
  });

  // 如果没有需要调整的项目,返回空操作
  if (operations.length === 0) {
    return NO_CHANGES;
  }

  // 返回所有价格调整操作
  return {
    operations,
  };
};
到此,如果你没有更改文件的名称,那么代码的开发部分就完结了,下一篇文章我们学习如何部署到测试环境,进行测试